|
SIMSKY - tutorial How to Create a High-Quality Picture
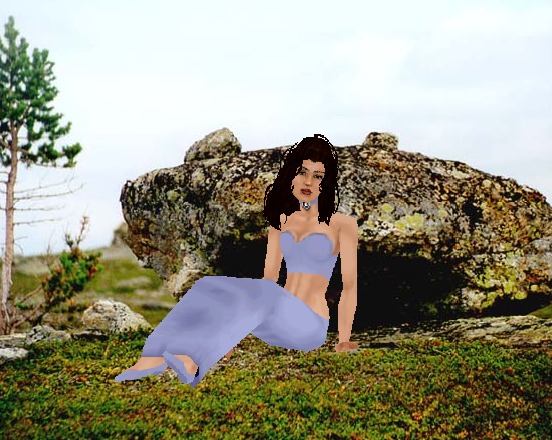
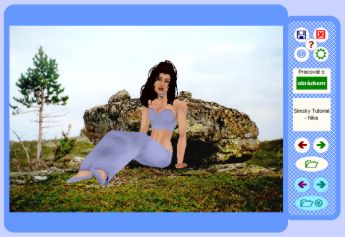
The aim of this tutorial is to create a picture similar to this one:
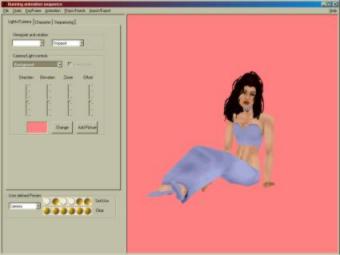
Launch Simpose, choose your favorite figure and let her sit. The result will be like this:
Now choose a suitable color for the background. Click on the menu for Lights/Camera. Under the Lights/Camera controls choose "Background". Click below on the button Change. The Color menu will open. Click on the long button "Define Custom Colors". Now the window looks like this:
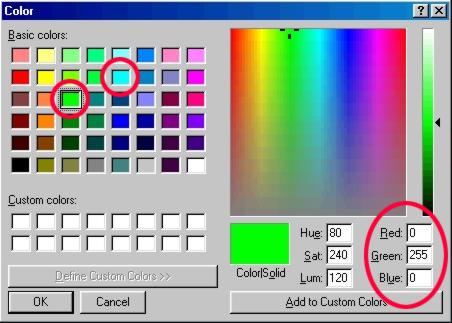
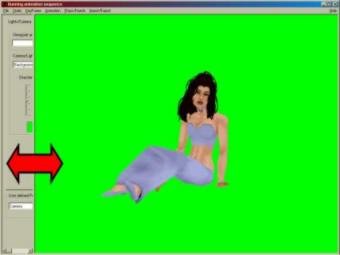
Select a color that does not occur on either the figure or her clothing. For example, for blue eyes choose a green background, for green eyes choose a blue one. However, the color must have an RGB gain setting of either 0 or 255, as shown in the circle at the bottom right. Otherwise Simsky won't identify it as transparent. The two most used colors for me are shown in the circles on the grid. While in Simpose you should define the size for your final picture. Simsky sizes the entire final picture according to the proportions of the picture in the foreground (including its transparent background). In Simpose adjust the main window with your figure by dragging the left border. The picture below indicates how you might size the window for a sitting figure that you want to picture seated in a forest. Bear in mind how the figure will look in the resulting scene - it is not always suitable to enlarge the figure to the maximum!
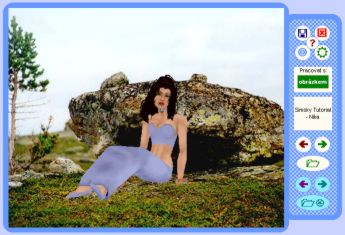
Now you're ready to save the picture. If you're running an animation, stop it through File - Speed - Single step, and by pressing space, find the most suitable pose for the figure. Then just click on menu File - Screen Capture - Full Size, name the picture and choose the place to save it. The extension is BMP. After saving the picture in Simpose you can re-start the interrupted animation by pressing Enter, set the main window to the original size and close Simpose, and now you will start using Simsky. Launch Simsky. Open the BMP picture you have made in Simpose. Then open a background (in JPG or BMP format) that goes nicely with the figure - for example a rectangular picture of a forest glade. Simsky has automatically set a transparent background for your Sim figure and arranged the background with regard to the center of of the Sim figure:
The last step is to set the size and position of both the picture and background in such way that the scene looks realistic. If you don't remember the keyboard shortcuts for changing the size and position of the picture, press F1 to display the Simsky Help menu and click on the button Position and size. If the selected background has similar proportions to the one shown above, with a lot of blue around the top edges, that means it has smaller height than the window with the figure. It is desirable to enlarge it proportionally in such way that it fills the whole window. Press the "/" key (or click on the green button to Adjust "picture" - it switches over to blue color saying Adjust "b'ground"). Enlarge the background by holding down Ctrl and dragging the edge of the picture with the mouse (or by pressing Ctrl and "+" on the numeric keyboard). Then move it to a good position by dragging it with the mouse (or by nudging it with 1-4 and 6-9 on the keypad. Hold down Control plus 1-4 or 6-9 to move the picture 5 pixels at a time instead of one). Select a suitable size in relation to the figure (in this example so that the trees in the background aren't too big or small in relation to the sitting Sim). Then switch over to the "Adjust picture" mode (again with the help of the Adjust button or by pressing slash) and modify the position and size of picture in such way that it goes together with background. In my case it was necessary to minimize the figure a little by pressing numeric keypad minus and then seat her accurately down in the grass by nudging her down with number 2 on the numeric keypad:
If you have become confused while setting the position or size, reopen the foreground and background images again. If you only want to re-set to the initial size without opening the files from disc, press 0 on the numeric keypad; for re-setting to the initial position press 5 on the numeric keypad. Or press F5 to reopen the foreground or background image from disc. It is easier to start by resetting the foreground picture rather than the background, because the parameters of background are being set with regard to the foreground picture. Now you can modify the colors/lighting of the figure or background independently, as you have already learned in previous lessons of the tutorial. When you are satisfied, save the resulting picture - press F2 or click on the diskette icon. If you are asked by the program whether the (foreground) picture size should be adapted to the background in a certain direction, it signifies that the background image in that direction doesn't reach to the border of the common window and the foreground picture extends beyond the background image and sticks out past it to the border of the window. Only the transparent part of picture should overreach - in that case select "Yes" and the picture will be cut to the background border. If this is not the case and the overreaching part of the foreground image is not just the transparent part - for example if the leg of figure overreaches the background - select "No" and the foreground image won't be cut. Under the overreaching part of the figure the blue background will remain. Any parts of either the figure or the background that overreach the common window are cropped automatically. Then Simsky asks you where and under what name you want to save the picture. Simsky adds the ending @ Simsky to the original name of the picture, which you can arbitrarily change. Now you can re-open the resulting picture. You can carry out any color changes or lightening of the resulting JPG picture, and save by pressing F2 or the diskette icon. Or, you can re-open the resulting picture as a background, in case you want to add other figures to the scene. Do you want more? For example the possibility of saving the resulting image in more formats and in any size? Or an automatic creation of picture thumbnails during saving? No problem! Write me what you would like to add to Simsky and if there are enough of you, I will implement your requirements in the program!
|