|
SIMSKY - tutorial How to Highlight a Part of Picture
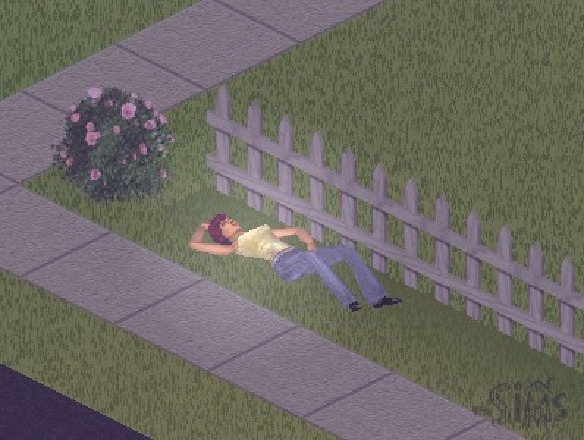
The aim of this tutorial is to create from a nighttime Sims picture a larger picture with a highlighted figure, modified to the tones of a coming morning. If you don't possess a suitable photo, download this picture:
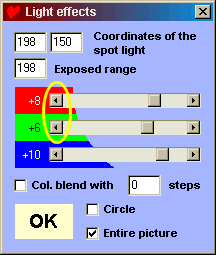
At first create a dawn effect. At dawn everything has a slightly purple shade. From graphical point of view the purple color arises through enhancing the blue and red color component of the picture. Open the Light effects menu (by pressing the asterisk on your numeric keyboard or by clicking on the green icon with the sun). Here make sure the field 'Entire picture' has been checked. Now set the lighting of the picture to increase the purple component. The bars for changing the color component default to the value +10, which means that at this setting the picture would be lightened only by 10 steps. Instead rearrange the bars according to the picture below. By clicking on the end of the red bar as circled below, lower the red color component color change to the value +8, and by clicking on the same end of the green bar put the green component somewhat lower - to the value +6.
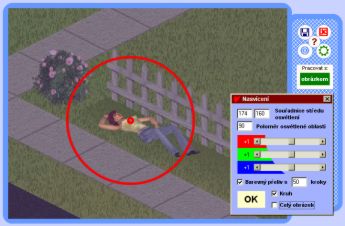
Press Enter several times (or keep clicking the OK button) to apply the effect. The picture will start gradually lightening and gaining a purple shade. It is usually sufficient to click four times, but my monitor is set to low brightness and that's why I added three further clicks so that the picture may be clear enough. If you go too far, there is no need to worry - press the F7 key on your keyboard, which results in reverting the picture to the saved state. When you are satisfied with the current state of picture, save it to memory by pressing F6. Then you can without worry continue to adjust the colors and brightness - and at any time you can return to the previous saved state of the picture by pressing F7. Press F6 to save the lightened picture to memory, and now learn to highlight the figure. Move the menu so that it doesn't cover the figure (by dragging its upper strip). Check off the box for Color blend. The colored bars switch over automatically to the minimum lighting change and the mode of lightened shape changes to circle. This picture will help you understand:
Click with the right mouse button on the place where you want to situate the center of the lightened area - it is marked in the picture above with the small red circle. Then hold down Ctrl and click the right mouse button to where you want to extend the radius (the reach) of lightening - shown here in the picture with the big red circle. (Simsky will indicate the center of lightening by a white small circle and the radius with a dashed circle.) The coordinates of the center as well as the radius of lightening will be also displayed in the Light effects menu where you can also modify them, for example in the case where you want to place the center of lightening outside of the visible part of a picture. In the center, the lightening will be the most intense, whereas at the border there is almost no extra light. This is similar to the effect of a figure lit by a street lamp or the rising sun. Apply the effect by pressing Enter or clicking the button OK. If you want to accentuate the effect, set the steps in the field Color blend with a higher level of steps. In my case 50 changeover steps were optimal. By pressing F7 you can reload the previous version of the picture and start over. Should you want to change the position or radius of the lighting effect, by pressing F7 reload the previous saved version of the picture, and by clicking the right mouse button set your new position, or with Ctrl create a different radius for the effect. Once you are satisfied with the result, you can close the Light Effects menu by pressing Esc. To save the picture, press F2 (or click on the icon of a diskette). If you want to replace the original picture from The Sims, find its name, click on it, then click the button Save and in the rewriting confirmation choose Yes. If you want to save the resulting picture under a new name, you may have noticed that The Simsky added to the name the ending @ Simsky (which you can arbitrarily change) and by clicking on the button Save, your picture will be saved in the selected folder. If your picture is really good, send it to me at the address below together with the description, such as who is there and on which occasion it was made - the best and most funny pictures will be exhibited in the Pictures Gallery. Do you want more? For example an automatic setting of suitable brightness and contrast of the picture? Or the possibility of automatic or manual sharpening the picture? No problem! Write me what you would like to add to Simsky and if there are enough of you, I will implement your requirements in the program!
|